Pear Galette


This Pear Galette may look and sound fancy, but it’s actually so easy to make! You don’t need to make your own crust from scratch, and you don’t even need a pie plate. The flakey, buttery crust is the perfect match for the sweet, juicy cinnamon pears. Serve this free-form pear pie with a scoop of ice cream for the ultimate fall dessert!
EMAIL ME THE RECIPE!
A pear galette has all the flavor that you love in a classic pie with half the work! There’s no better way to take advantage of pear season.
Pears are usually the back up singers during the fall. The apples and pumpkins usually take the lead and steal the show. Well, move over apples and pumpkins because it is time for the pears to shine. This pear galette is a real show stopper!
I’ll be honest, when I’m planning recipes for this time of year, I get really excited about baking with apples and pumpkin, and seem to just forget about pears. But when I bite into a ripe, juicy pear, I remember how delicious they taste and kick myself for not including them in more of my recipes. Pears really are quite tasty!
If you love pears, too, and you’re looking for a fall dessert that’s easy to make, yet tastes amazing and looks impressive, this pear galette recipe will be your new favorite cozy, sweet treat.
Looking for more pear recipes? Try my upside down pear cake next!
This came out well using Harry and David pears that were ripening way too fast! A bit of crispy on the top. I grated some butter on the apples before popping in the oven. I needed 10 minutes more time as I used a hearty thickness pie crust recipe. Definitely a keeper in the recipe book. Will try this with apples next.
— Wanda
Ingredients you’ll need
The ingredients that you need to make this pear galette recipe are so simple! I bet you already have most of them in your kitchen and pantry. Check out the recipe card at the bottom of the post for exact ingredient measurements.

- Refrigerated pie crust dough. Some galette recipes call for puff pastry; however, a more traditional galette uses dough that’s buttery and flaky like a pie crust. You can make your own galette dough recipe from scratch, but I think the Pillsbury refrigerated pie crust dough is a really high-quality shortcut. The Pillsbury dough is sold in packs of two, and you’ll only need one crust for this recipe. Stash the extra crust in the freezer or fridge to use for another galette recipe later!
- Pears. I recommend using slightly firm, but ripe Bartlett or Anjou Pears. These varieties are super juicy, naturally sweet and perfect for baking.
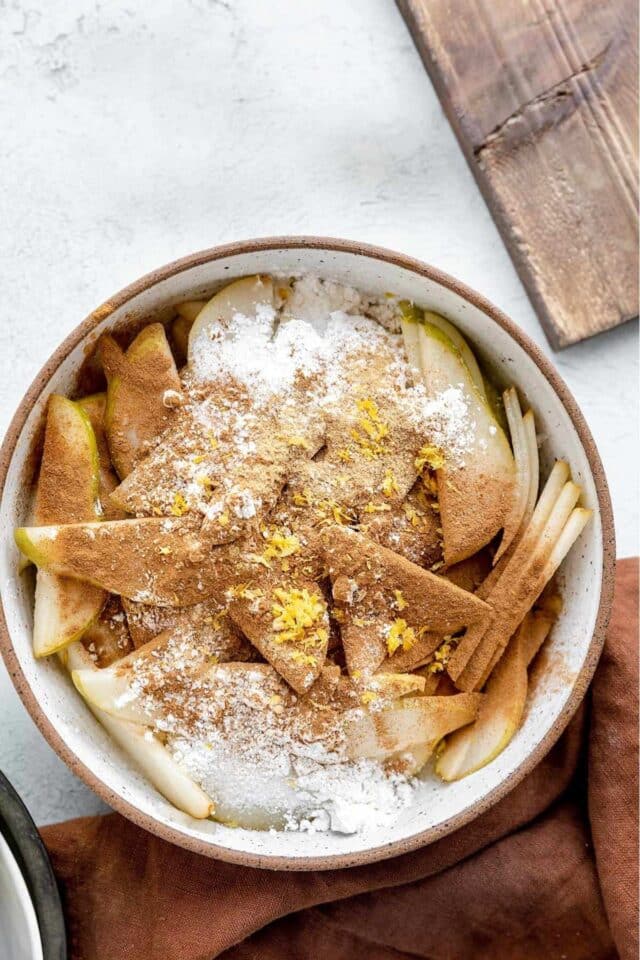
- Granulated sugar. To sweeten the galette.
- Flour or cornstarch. Helps to thicken the filling, so it’s not too juicy.
- Flavor boosters. A blend of ground cinnamon, ginger and salt add warm, cozy flavor!
- Lemon. Lemon juice and lemon zest will brighten the taste of the pears.
- Butter. For rich buttery flavor, a very small amount of butter is added on top of the sliced pears before baking.
- Egg. Brush on the crust to give it a beautiful golden brown color.
- Coarse sugar. Sprinkle coarse sugar over the pear filling and crust before baking for a little extra sweetness. If you don’t have coarse sugar, you can just sprinkle a little granulated sugar on top or skip this step.
How to make this recipe
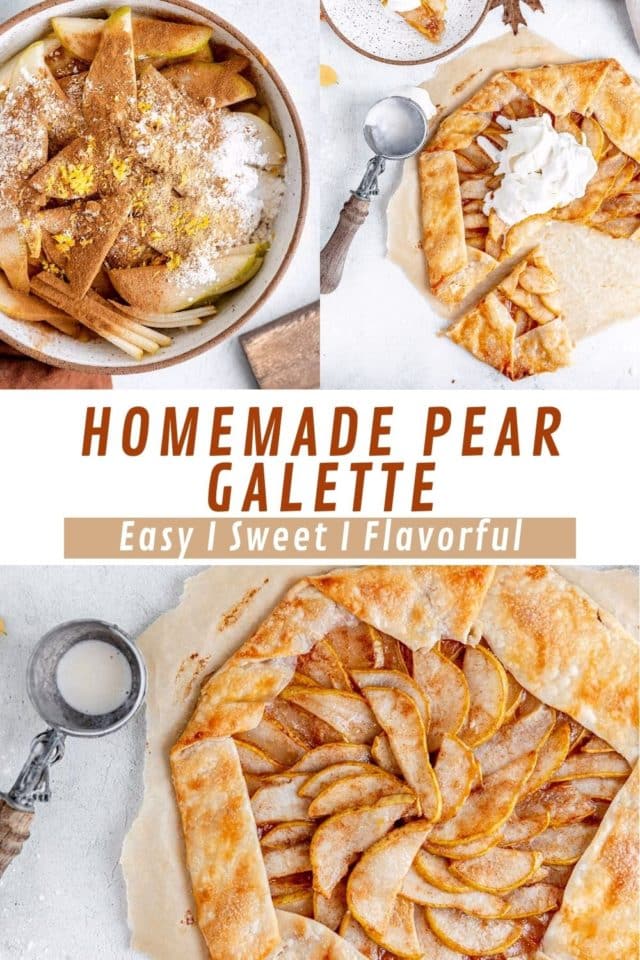
- Roll out the dough. Let dough sit at room temperature for about 15 minutes. Place the pie crust between two pieces of lightly floured waxed paper. Use a rolling pin to roll out the dough into an 11-inch circle. This doesn’t have to be perfect, so don’t stress if it’s slightly uneven. Transfer the dough to a baking sheet, cover and refrigerate for 15-30 minutes.
- Make the pear filling. In a large mixing bowl, stir together the pears, sugar, flour, cinnamon, ginger, salt, lemon juice and zest. Gently toss the pears to coat.
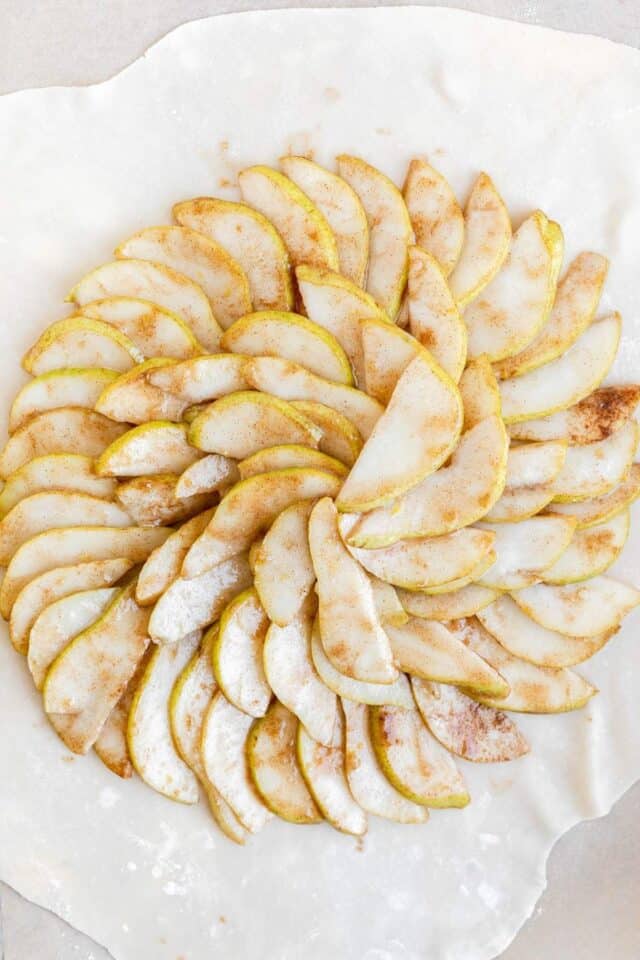
- Add the filling. Arrange the pear filling in the center of the dough, mounding the fruit slightly and leaving a 2-inch border.
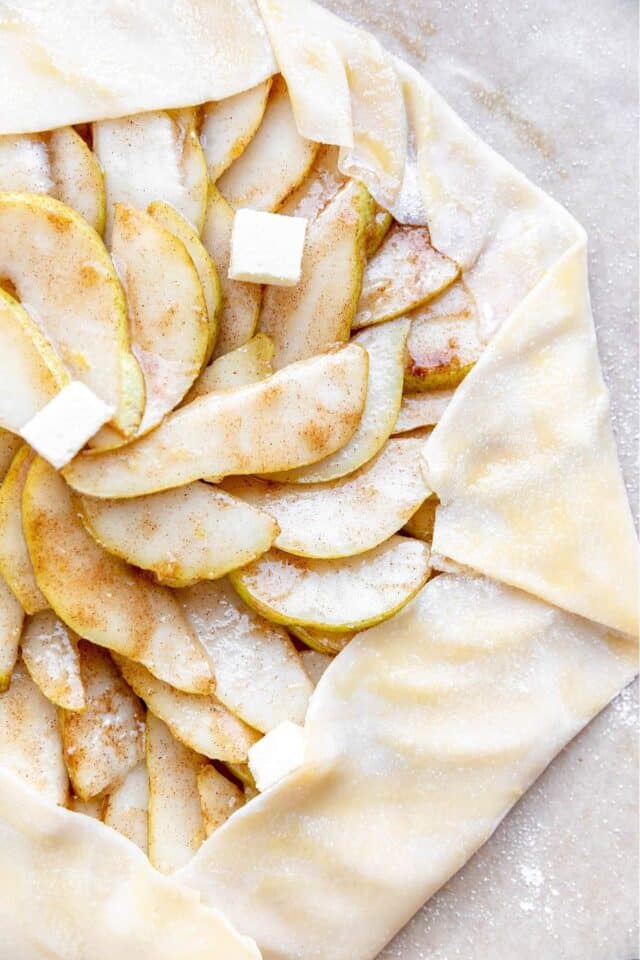
- Fold the edges. Gently fold the edges of the dough over the pears, pleating loosely. Again, we’re going for a rustic look – this doesn’t need to be perfect! Brush the dough with egg wash and sprinkle with sugar.
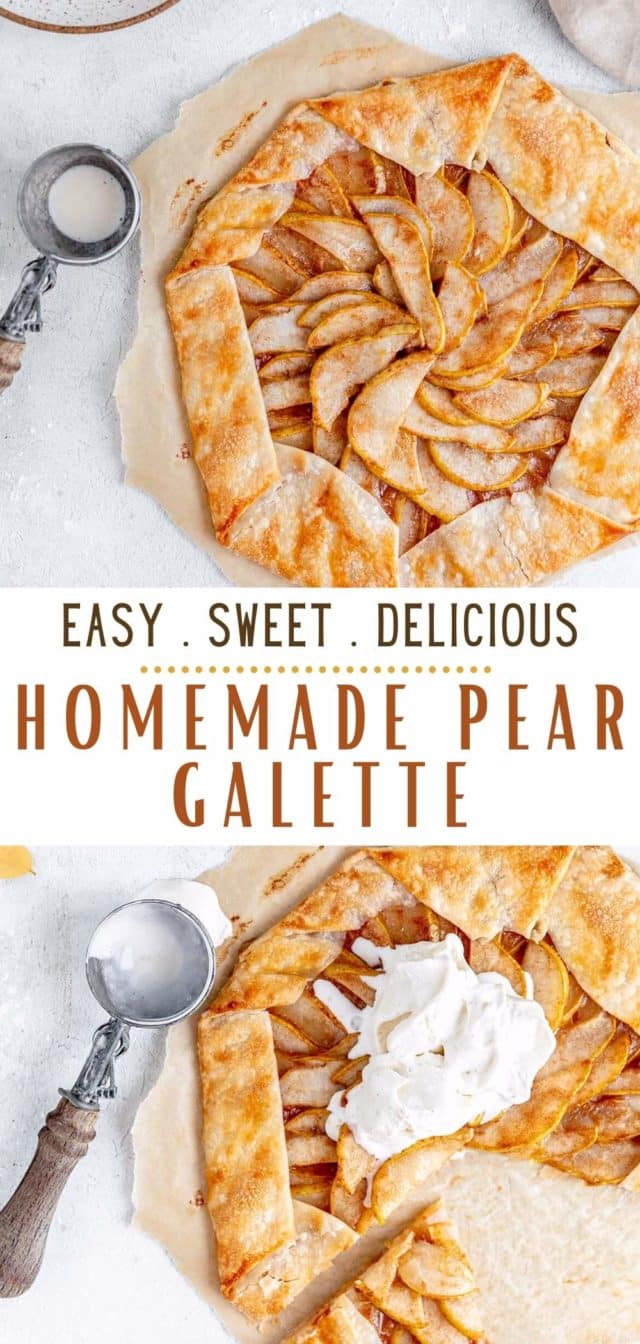
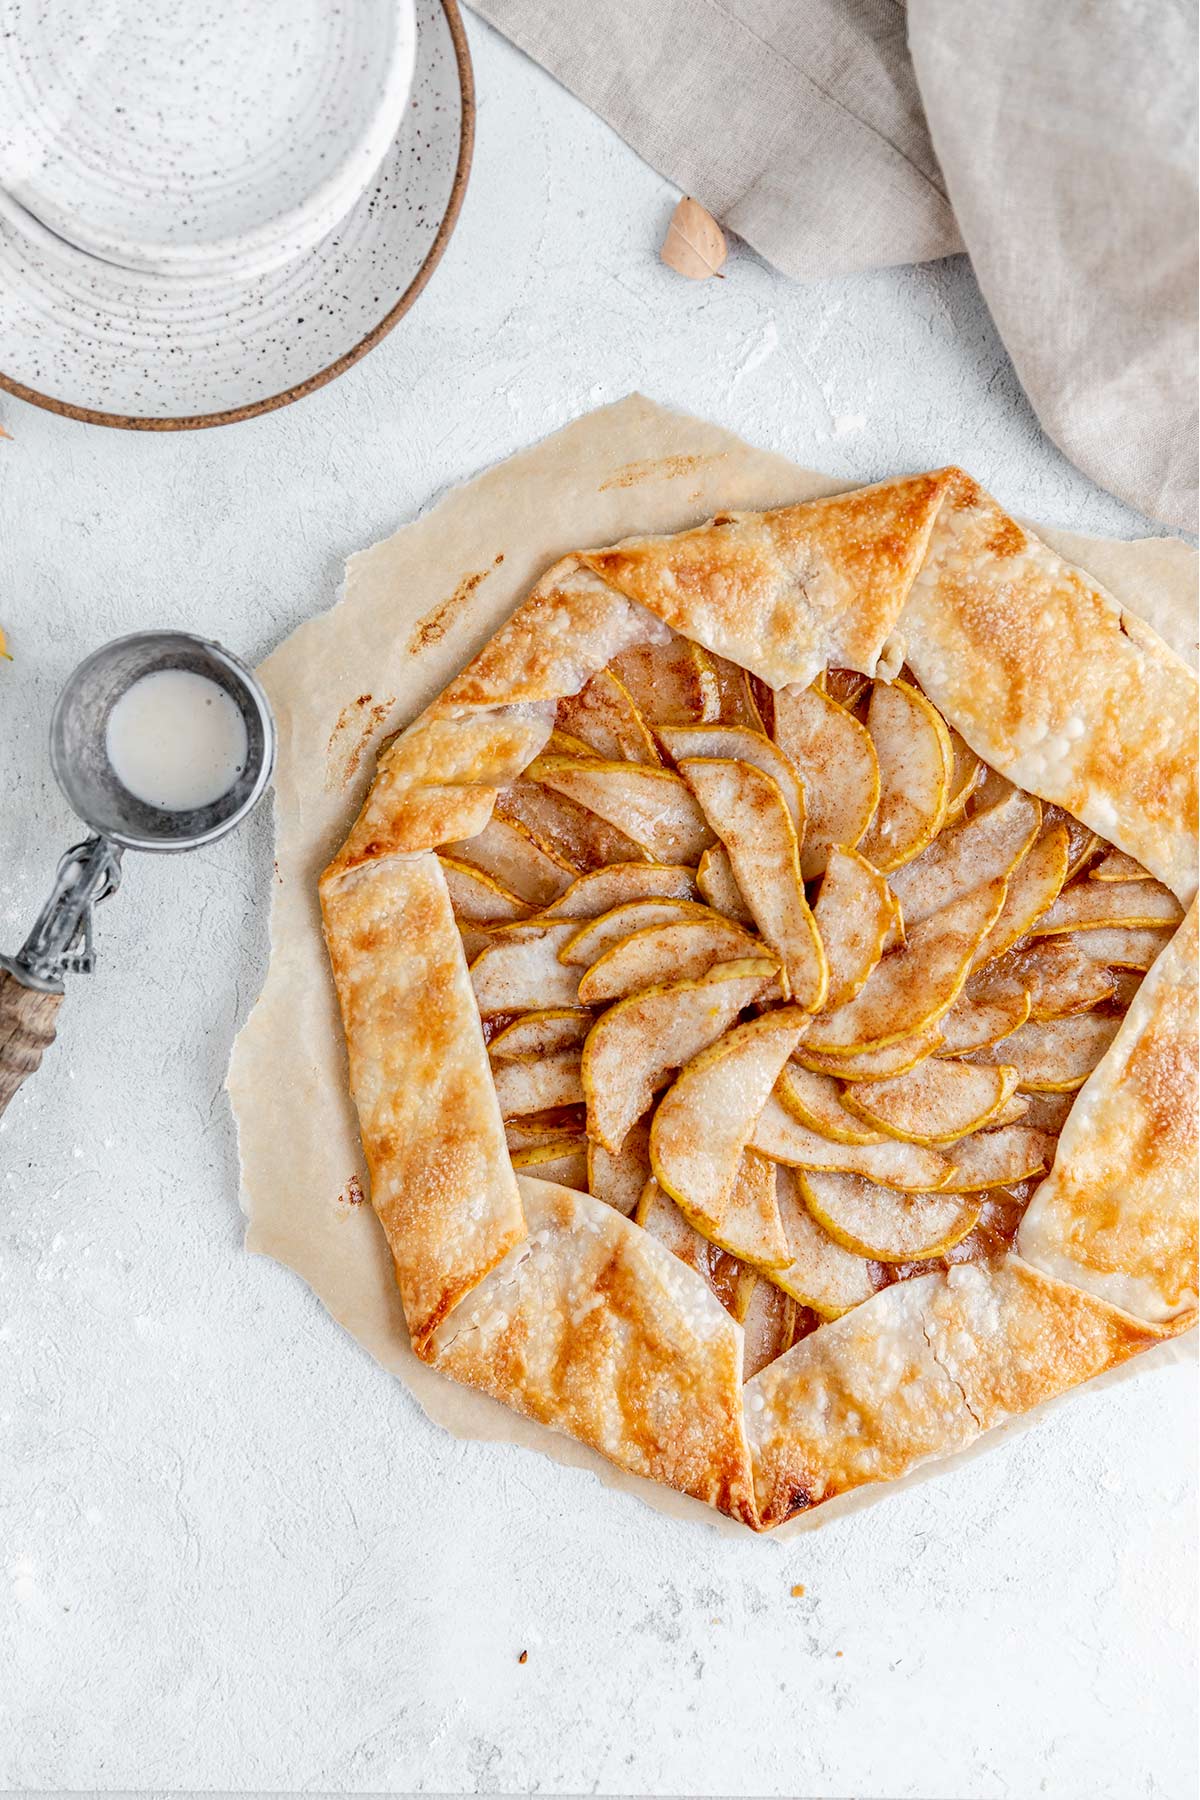
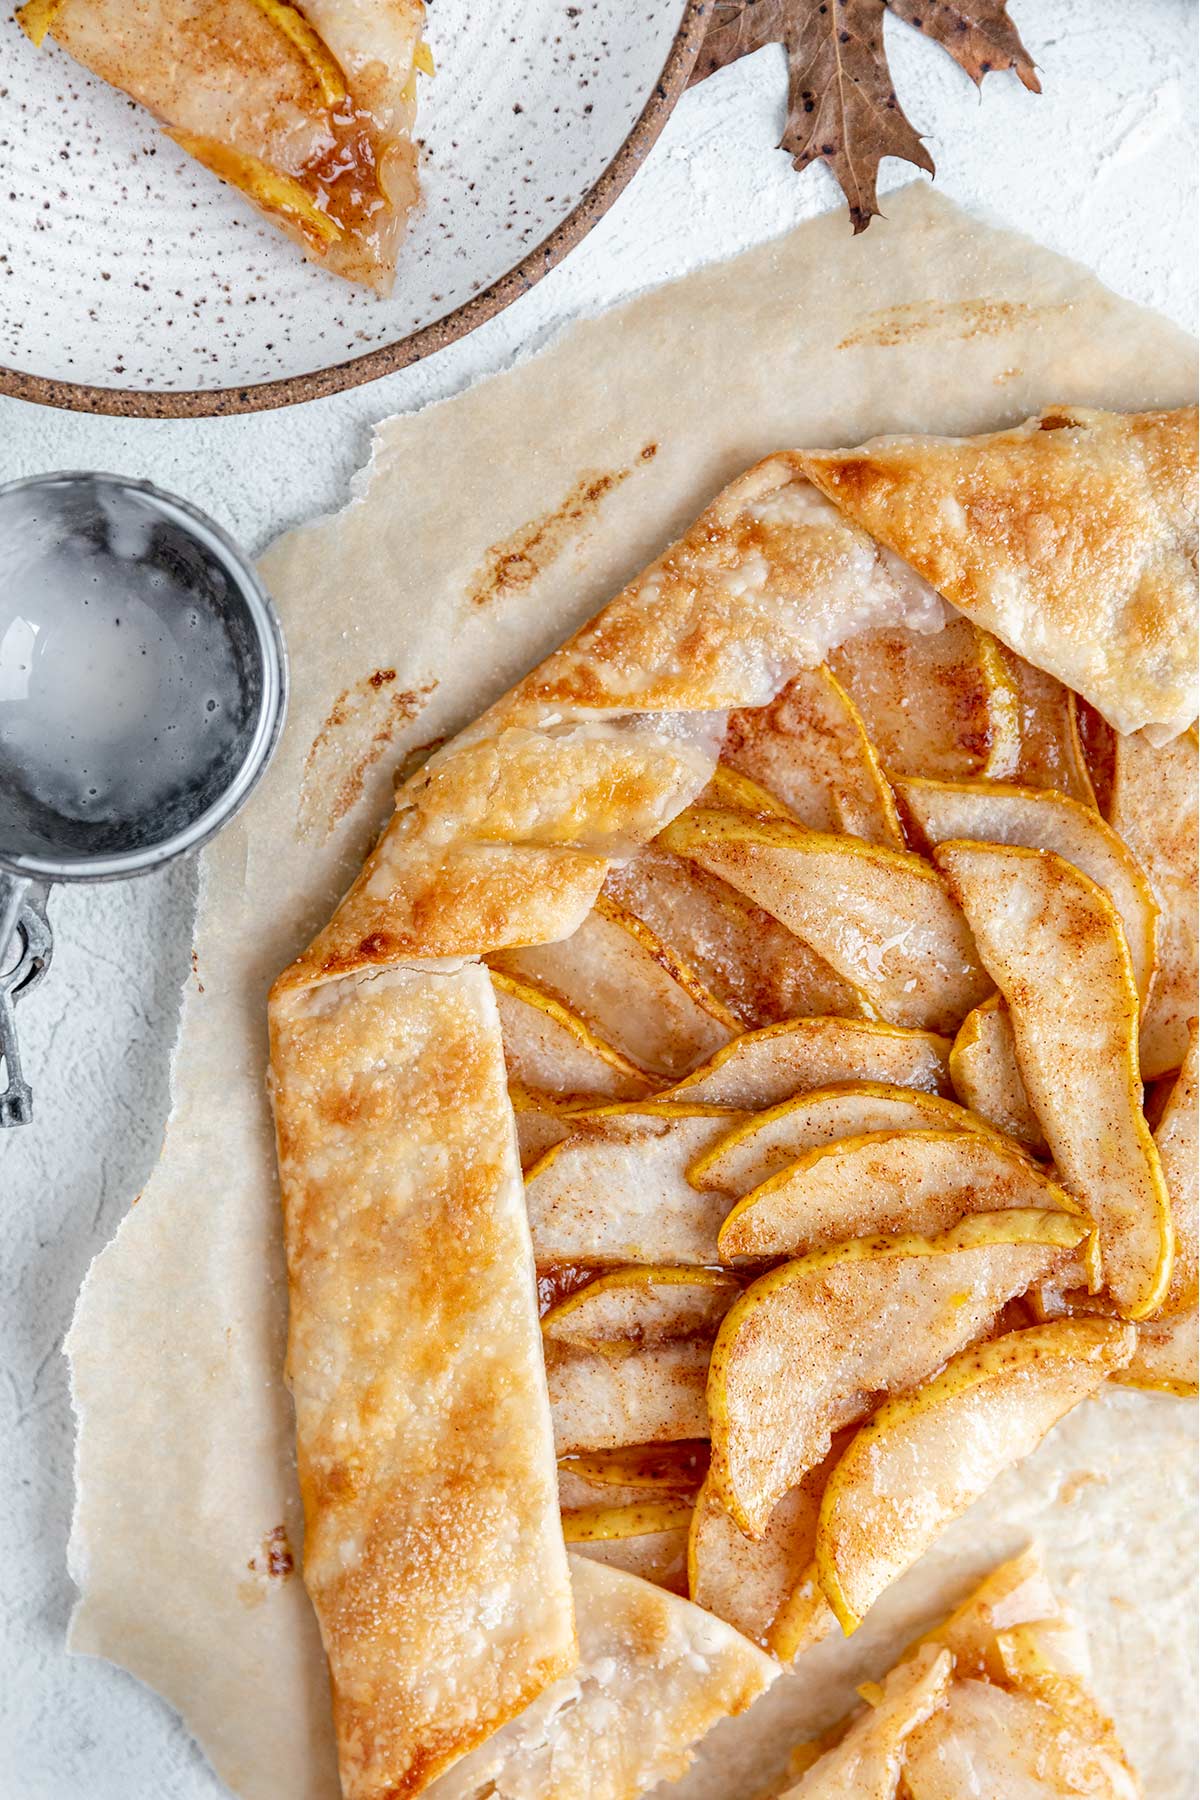
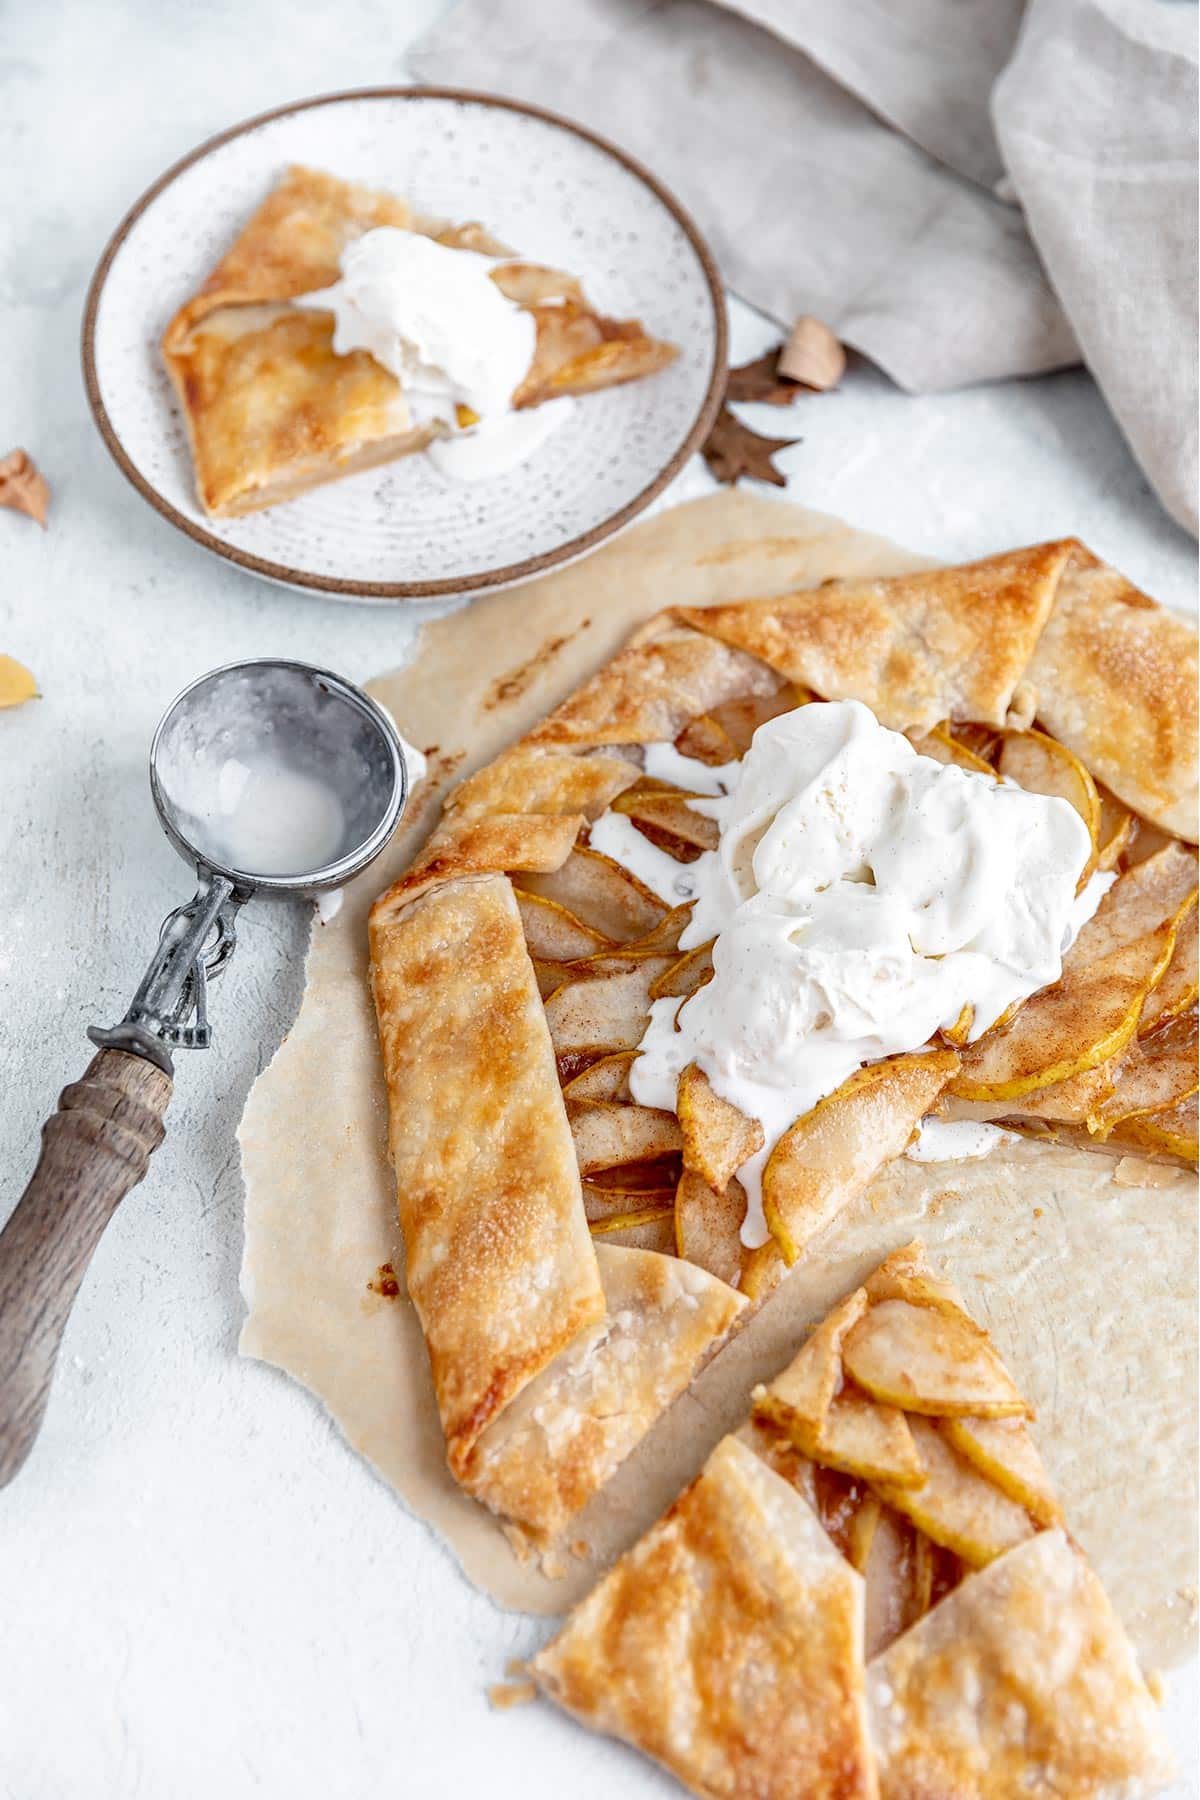
- Bake. Place the galette in a 400 degree F oven for about 20 minutes, or until the crust is golden brown.
- Cool and serve. Cool galette for about 20 minutes. Serve warm or room temperature with ice cream or whipped cream. Enjoy!

Pro tip. Zest the lemon before juicing it. It’s much easier – trust me! Zest first. Juice second. And when it comes to baking, don’t use bottled lemon juice, use fresh for the best flavor.
Recipe tips
This pear dessert is really very easy and almost impossible to mess up, but here are a few tips to make sure your galette turns out perfect every time.
- Best pears to use. I prefer to use Bartlett or Anjou Pears for this recipe, since they have more structure and can withstand the baking process.
- How to know if the pears are ripe. Pears are the perfect ripeness for this recipe when they yield slightly to pressure, but are still firm. Try to select fruit that is free of blemishes and/or bruises.
- Peeling pears. When peeling the pears, work in long, even strokes to avoid an uneven appearance. Use a vegetable peeler, which works perfectly. Be careful not to bruise them when peeling.
- Use vanilla. If you don’t have lemon juice and zest, substitute with vanilla extract for added flavor.
- Use apples. Try swapping out the pears and using apples in this easy galette recipe. If using apples, cut them about 1/4-inch thick and you’ll likely need to increase the bake time to 35-40 minutes.
Frequently asked questions
Yes, just like a pie, a galette is made pie dough, but the structure of the dessert is different. Instead of baking a galette in a pie plate, the galette is “free form,” meaning that it’s just baked on a flat sheet pan. It only has a bottom crust. This gives the galette a more rustic look and feel, and it’s virtually impossible to “mess up”. You don’t have to worry about crimping the edges, creating a lattice top, or blind-baking with pie weights!
Adding flour or cornstarch to the fruit filling will keep it from being too liquid-y, and also brushing the interior crust of the galette with egg before adding the filling can help prevent a soggy bottom.
The galette should bake until the crust is a golden-brown and the fruit is bubbly and soft. This will take about 20 minutes.
Favorite toppings
There are two classic toppings for a fruit galette like this one. My personal favorite is a cold, creamy scoop of vanilla ice cream. Another go-to topping is whipped cream, which is almost as delicious as vanilla ice cream. A pear galette is also delicious without any topping at all!
The cold ice cream combined with the warm pears and sweet, flakey crust is pretty epic though…
Make ahead and storage recommendations
This is a convenient dessert, especially if you’re entertaining because you can make it ahead of time! Bake it the night before, and store, covered, at room temperature.
- Storing leftovers. Cover any leftover galette or transfer it to an airtight container and store it in the refrigerator for 3-4 days. Keep in mind the crust may get soggy after about 24 hours.
- To freeze. Place in a freezer-safe storage container and freeze leftovers for up to 3 months. Thaw in the refrigerator overnight before reheating.
- To reheat. Place the galette on a baking sheet and warm in a 375 degree F oven for about 10 minutes. The microwave will work for individual slices, but the crust won’t crisp up as nicely.
I can’t think of many other fall desserts that are as delicious and cozy as this easy pear galette served with vanilla ice cream. Definitely add this to the dessert menu for any fall gathering or celebration, especially Thanksgiving!
More favorite fall desserts
If you try this pear galette recipe, let me know! Leave a comment and if your family loves it as much as mine does, be sure to give it a five star ⭐️ rating! Also, tag @kimscravings on Instagram with a picture of your creation. Be sure to subscribe to our mailing list to receive more healthy delicious recipes straight to your inbox.

Pear Galette
Ingredients
- 1 refrigerated pie crust dough, I prefer Pillsbury brand*
- 3-4 slightly firm but ripe Bartlett or Anjou pears, peeled and cut into thin slices, lengthwise
- 1/4 cup granulated sugar
- 2 tablespoons flour or cornstarch
- 1 teaspoon ground cinnamon
- 1/4 teaspoon ground ginger
- 1/4 teaspoon salt
- 1 tablespoon lemon juice
- 1/2 teaspoon lemon zest
- 1/2 tablespoon butter, cold and cut into 4 pieces
- 1 egg, beaten
- Coarse turbinado sugar or granulated sugar, for sprinkling
EMAIL ME THE RECIPE!
Instructions
- Line a rimmed baking sheet with parchment or a silicone mat and spray with cooking spray. Set aside.
- Remove the dough from the refrigerator and let stand for 15 minutes. Place the dough between 2 sheets of lightly floured waxed paper and roll out into an 11-inch circle. Brush off the excess flour. Transfer the dough to the prepared baking sheet, cover with plastic wrap and refrigerate for 15-30 minutes.
- Meanwhile, preheat oven to 400 degrees F.
- In a large bowl, stir together the pears, sugar, flour, cinnamon, ground ginger, salt, lemon juice and zest. Gently toss the pears to coat.
- Arrange the pear filling in the center of the dough, mounding the fruit slightly and leaving a 2-inch border. You can arrange the pears in a spoke pattern or keep it rustic.
- Gently fold the edges of the dough (outer 2 inches) over the pears, overlapping where necessary and pressing gently. It doesn't have to be perfect.
- Dot the cold butter onto the top of the pear filling. Brush the dough with the beaten egg (you won’t need all the egg). Lightly sprinkle sugar over the pears and on the crust.
- Bake at 400 degrees F. for about 20 minutes or until crust is golden brown. Transfer the baking sheet to a wire rack to cool for at least 20 minutes. Serve warm or at room temperature. Best served with vanilla ice cream or whipped cream. Enjoy!
Notes
Did you make this recipe?
Tag @kimscravings on Instagram and be sure to subscribe to our mailing list to receive more healthy and delicious recipes straight to your inbox!
This came out well using Harry and David pears that were ripening way too fast! A bit of crispy on the top. I grated some butter on the apples before popping in the oven. I needed 10 minutes more time as I used a hearty thickness pie crust recipe. Definitely a keeper in the recipe book. Will try this with apples next.
Sounds delicious! So happy you enjoyed!
Hi there,
Question: could I prep the galette (minus the egg wash, butter and sugar) and freeze it to bake later? Or would it be better to bake, freeze, and toss in the oven to warm and crisp again?
I think it would work either way. Hope you enjoy!