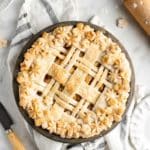
Homemade Apple Pie
This Homemade Apple Pie has a deliciously gooey, sweetly spiced apple filling that is nestled in a flaky, tender pie crust. It's the perfect recipe to enjoy fall flavors and fresh-picked apples this season! Serve warm with a scoop of vanilla ice cream for the ultimate dessert.
Ingredients
2-Crust Pie (8 to 9-inch pie dish)
- 2 cups (240g) all-purpose flour*
- 1 teaspoon salt
- 2/3 cup plus 2 tablespoons (151g) shortening
- 4-5 tablespoons cold water
2-Crust Pie (10-inch pie dish)
- 2 2/3 cup (325g) all-purpose flour*
- 1 teaspoon salt
- 1 cup (191g) shortening
- 7-9 tablespoons cold water
Apple filling (8 to 9-inch pie dish)
- 3/4 cup (150g) sugar
- 1/4 cup (32g) all-purpose flour*
- 1/2 teaspoon cinnamon
- dash of nutmeg
- dash of salt
- 6 cups tart + sweet apples (I like to mix Granny Smith apples with a sweet apple like Honeycrisp), cored and sliced to about 1/4" thickness (roughly 6 medium apples)
- 2 tablespoons (28g) butter, cut into slices
Apple filling (10-inch pie dish)
- 1 cup (200g) sugar
- 1/3 cup (41g) flour*
- 1 teaspoon cinnamon
- dash of nutmeg
- dash of salt
- 8 cups tart apples, cored and sliced thin (roughly 7 medium apples)**
- 3 tablespoons (42g) butter, cut into slices
Topping
- 1 egg + 1 tablespoon water or milk for egg wash topping
- optional: coarse sugar for sprinkling
Instructions
For the crust
- To make the crust, mix the flour and salt together in a large bowl. Add the shortening. Using a pastry cutter (the one I own) or two forks, cut the shortening into the mixture until it resembles coarse meal (pea-sized bits with a few larger bits of fat is OK). A pastry cutter makes this step very easy and quick. Begin adding cold water and toss with a fork until the mixture is moistened. Do not add any more water than you need to. Stop adding water when the dough begins to form large clumps. Be careful not to add too much water or the dough will be sticky and difficult to roll out.
- Transfer dough to a clean work surface, and gather dough together into a ball (it should not be smooth and DO NOT knead the dough). Divide dough in half and flatten to form 2 disks.
- Cover the dough with plastic wrap and refrigerate about 1 hour before assembling the pie. You can make the filling while the dough is chilling.
For the filling
- Preheat your oven to 425ºF. In a large bowl, using a rubber spatula or wooden spoon, stir the sugar, flour, spices and salt with the apples until thoroughly combined. Set filling aside as the oven preheats; this time allows the apples to begin letting off their juice.
Assembling the pie
- Lay out wax paper and sprinkle a bit of flour over it to roll out the dough on. This will allow you to simply lift the wax paper up and flip it onto the pie dish. It makes it very easy and you often avoid ripped crust! I’ve found that slightly wetting the countertop before laying the wax paper down, then flouring the wax paper surface creates the best area for rolling. The water helps hold the wax paper down, and the flour will keep the dough from attaching to the wax paper.
- Slide your wax paper over to your pie dish and in one quick motion flip the crust onto the dish. Press in gently. Transfer the filling to the pie dish using a slotted spoon (making sure to leave as much juice as possible in the bowl) and smooth the top. Add pats of butter to the top. Repeat with the top crust.
- Fold the top crust down under the bottom crust, and press it against your dish. Crimp the edges to seal. You can get fancy with a pattern, or go “rustic” with a more undone and less polished look. Cut 3-4 slits on top of the pie.
- Beat together 1 egg and 1 tablespoon water or milk and brush the top with egg mixture. Sprinkle the top with coarse sugar.
- Place the pie onto a large baking sheet and bake in the preheated oven for 15 minutes. Reduce the temperature to 350ºF. Continue baking for 35 to 45 minutes, until apples are soft and the filling bubbles through the top of the pie slits. Do NOT remove that pie until you see bubbles. (After the first 15 minutes of bake time, I recommend placing a pie crust shield on the crust’s edges (or cover with foil) to prevent it from over-browning too quickly. Here's a tutorial for making a DIY pie crust shield.)
- Once it’s finished baking, set it on the counter to rest at room temp at least 1 hour (3 hours is best) before serving. It’s hard to wait, but if you cut into it while it’s still warm the filling will be too runny. If desired, serve with fresh whipped cream or vanilla ice cream.
- Cover pie leftovers tightly and store at room temperature for up to 2 days and then in the refrigerator for up to 5 days.
Notes
*Measuring flour. Be sure to measure the flour using the “spoon & level” method. Do not scoop the flour out of the container/bag with your measuring cup. Instead, use a spoon to add the flour into the measuring cup. Do not pack the flour down and do not tap the measuring cup. After you’ve spooned the flour into the measuring cup, use the back of a knife to level off the top of the measuring cup. Alternatively, you can use a food scale to measure the ingredients.
**Apples. I recommend using half tart apples and half sweet apples. Tart Granny Smith apples paired with a sweet variety such as Pink Lady, Honeycrisp, Jazz, and/or Fuji apples will yield the best flavor. Be sure your apples are sliced in similar thickness. You don’t want some solid apples and some thin, mushy apples.
Make Ahead. Apple pie is a great dessert to make ahead of time! Make 1 day ahead of when you plan to serve it. Once it's baked and after it cools, cover tightly and keep at room temperature. The pie crust dough can also be prepared ahead of time and stored in the refrigerator for up to 5 days or in the freezer for up to 3 months.
Freezing Instructions. Baked pie freezes well for up to 3 months. Thaw overnight in the refrigerator and allow it to come to room temperature before serving. Prepared filling can be frozen up to 3 months, thaw overnight in the refrigerator before using.
Nutrition
Serving: 1serving | Calories: 426kcal | Carbohydrates: 59g | Protein: 4g | Fat: 20g | Saturated Fat: 6g | Polyunsaturated Fat: 5g | Monounsaturated Fat: 8g | Trans Fat: 2g | Cholesterol: 8mg | Sodium: 318mg | Potassium: 140mg | Fiber: 3g | Sugar: 29g | Vitamin A: 138IU | Vitamin C: 4mg | Calcium: 14mg | Iron: 2mg