Beef Chili Recipe


If you’re looking for the ultimate beef chili recipe, you’re in the right place. This no-bean version is rich, hearty, and just happens to be award-winning. There’s nothing better than a warm bowl on a cool day, and this one is easy to make and perfect for game day, cozy winter nights, or anytime you’re craving comfort food.
EMAIL ME THE RECIPE!

A Note from Kim
A Blue-Ribbon Bowl of Comfort
This beef chili recipe has been on repeat in my family for years, and for good reason. We’re pretty particular about our chili around here, and this one checks every box. It’s thick and hearty, with just enough texture without going overboard. The spice level is warm and comforting, not overwhelming, and the ingredients are simple and familiar. No odd extras, just classic flavors done really well.
And this recipe has a story behind it that makes it even more special, it’s my dad’s award-winning chili. When I was a kid, he entered this very recipe into our hometown chili cook-off and took home first place for best chili recipe. That blue ribbon made it family legend status, and once you taste it, you’ll see why it’s earned its place at our table year after year.
With love (and lots of good eats), ![]()
On Pinterest I looked for chili with no beans and got your recipe. I’m trying to eat a low glycemic food plan for diabetes and all the ingredients in your chili fit the bill. I only had yellow and orange peppers so I used them and I love cinnamon so I added that as well. I also took your suggestion and let it simmer the full two hours! Delicious, absolutely delicious! We had no toppings but it didn’t need it! My husband’s taking it to work tomorrow for lunch, that’s a huge compliment, he doesn’t do that often!
— Debbie
Chili Ingredients
Chili is one of those recipes that’s easy to make your own. These are the ingredients we love, but don’t hesitate to adjust, substitute, or leave things out based on what your family enjoys. Here’s the lineup:
- Protein. Feel free to use whatever ground meat you have on hand, from ground chicken to ground bison. If you choose a higher-fat ground beef, simply drain the grease once it’s cooked. 93% lean ground beef is my go-to.
- Yellow onions & garlic. A must for most any soup or chili recipe!
- Green bell peppers. Adds a slightly spicy and aromatic flavor. If you want to use red bell peppers instead, that works too! You can also reduce the onion and bell pepper to just one, if preferred.
- Tomatoes. My dad always used a 28-ounce can stewed tomatoes with liquid, which are larger and softer than diced tomatoes. You can totally use either, though! I like to use a can of crushed tomatoes and a can of diced with juice. For extra richness, add a tablespoon or two of tomato paste. And for a roasted flavor, use fire-roasted tomatoes.
- Beef broth. I recommend using a low-sodium beef broth, so you can control the amount of salt in the meal.
- Spices. We’re using a delicious blend of chili powder, cumin, salt, and black pepper. Feel free to use as much or as little as you prefer. For a little extra kick, add a dash or two of cayenne pepper.
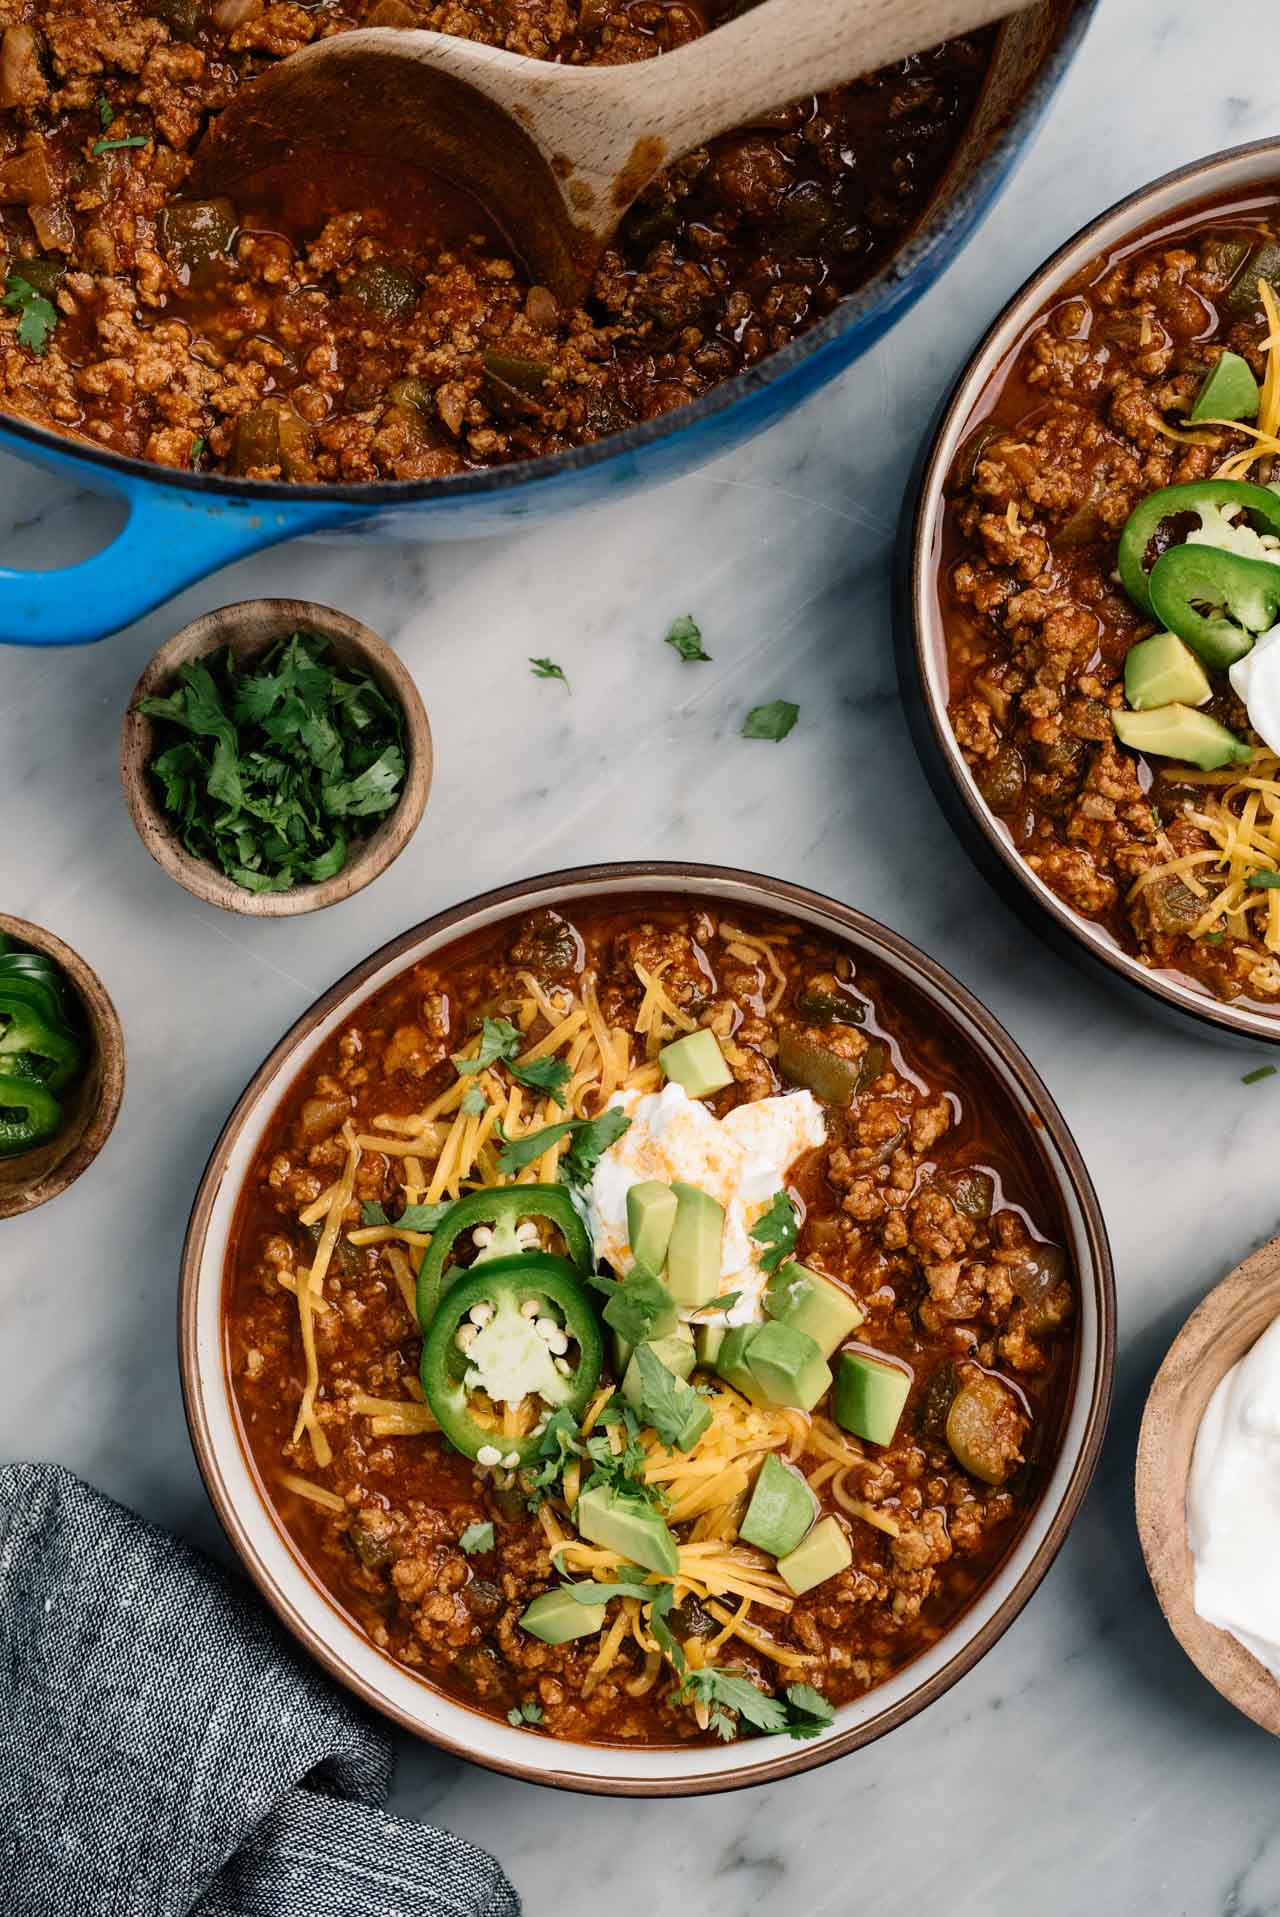
- For serving. Top your bowl of deliciousness with any favorites! We love sour cream, shredded cheese and diced avocado.
Recipe Variations
- Turkey chili. Use ground turkey instead of the beef. Or even a combo works, 1 pound turkey and 1 pound beef.
- Beans. Add 1 to 2 (15-ounce) cans of dark red kidney beans or chili beans.
- Beer. You can replace 1 cup of beef broth with 1 cup beef for extra depth of flavor.
- Seasonings. Add 2 teaspoons smoked paprika and 1 teaspoon garlic powder for a different flavor option. Oregano is also a popular seasoning for chili.
- Three bean chili. Use a total of 3 1/2 cups of black beans, pinto beans and kidney beans.
- Meat lovers chili. Use 2 pounds of cubed and browned stew meat instead of the ground beef.
How to Make This Chili Recipe
You may have tried other chili recipes, but this one’s a family favorite! It has tons of flavor and is super easy! Here’s the simple process, but for the full, printable recipe, reference the recipe card at the bottom of the page.

Step 1: Sauté. The first step in making this is to sauté the ground beef with the chopped onion, bell pepper and garlic in a large stockpot over medium-high heat. Cook the beef until just cooked through, it doesn’t need to cook too long because it will continue to cook as the ingredients simmer.
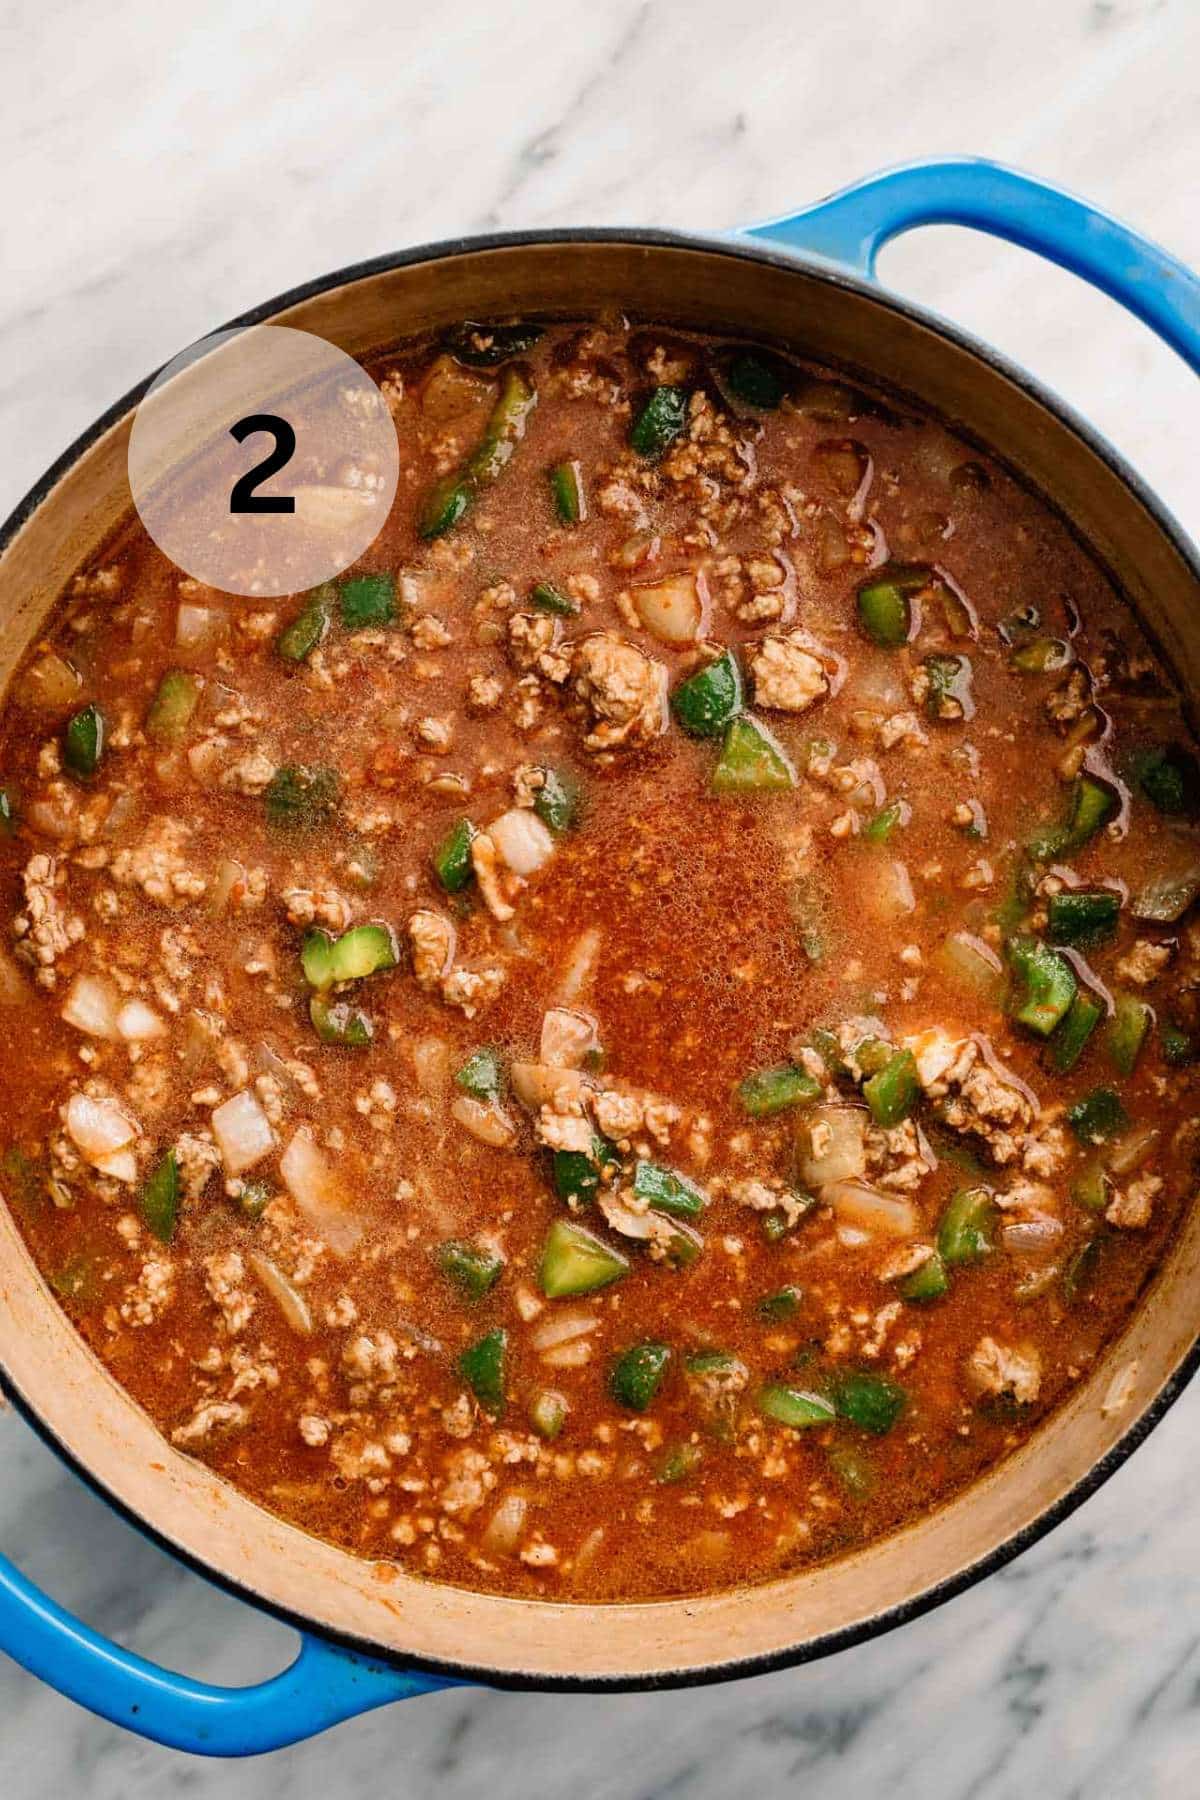
Step 2: Simmer. Add the remaining ingredients (tomatoes, beef broth, tomato paste, spices and brown sugar (if using)) into the pot. Simmer uncovered for at least 45 minutes and until the chili reaches desired consistency. Stir occasionally using a wooden spoon.
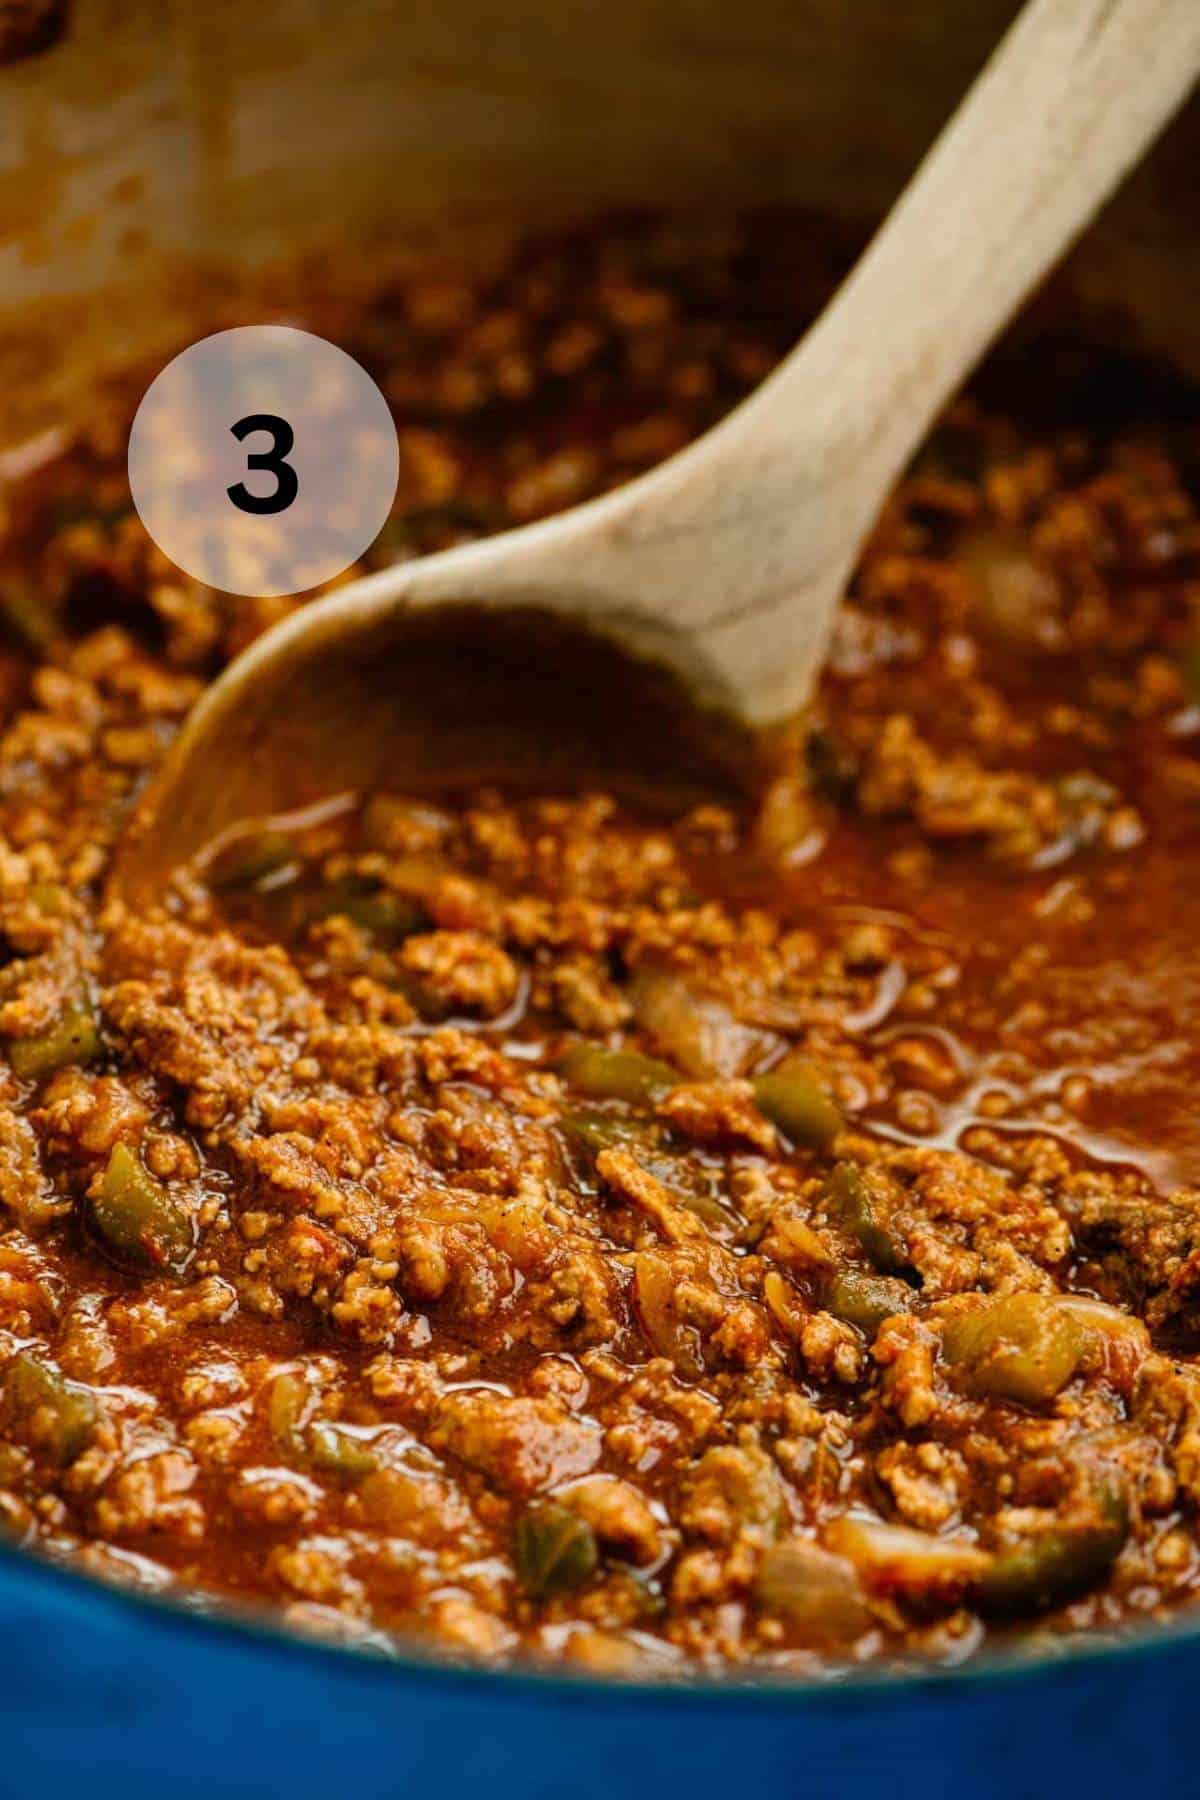
Step 3: Serve. Once cooked to your liking, taste and adjust seasonings. Then, ladle into bowls and top with your favorite toppings and enjoy!
My dad recommends letting the chili simmer over a couple of hours to let the flavors really come together and intensify. However, if you don’t have that kind of time, you can enjoy it after 45 to 60 minutes of simmering. It’s even better the next day after all of the flavors really have a chance to meld. Yum!
Kim’s Recipe Tips
- What to serve with chili? Cornbread is the classic pairing for homemade chili. My skillet cornbread or Mexican cornbread are both great options. You can also serve it over a baked potato, on a hot dog, or over fries.
- Crockpot option. Using a slow cooker makes this chili extra flavorful and the beef perfectly tender. For best results, sauté the veggies and meat first, then add everything to the crockpot and cook on low for 5–6 hours. Skip the high setting, it won’t develop the same rich flavor.
- Toppings. Try sour cream or Greek yogurt, shredded cheddar cheese or crumbled cotija cheese, crushed tortilla chips or pieces of cornbread, sliced jalapeños, diced avocado or guacamole, and a sprinkle of fresh cilantro, green onion, or red onions.

How to Store Chili
- Storing leftovers. This will stay good in your fridge for about 1 week. Once it is completely cooled, just place it in an airtight container (or multiple, if you’d like to meal prep it) without any additional toppings and store it in the refrigerator.
- Reheating. Simply pop it in the microwave using a microwave-safe bowl, or feel free to reheat it on the stovetop. Add your toppings once you’re ready to serve!
- To freeze. This freezes beautifully and reheats really well. Follow the instructions above, but instead of placing it in the refrigerator just put it in your freezer for up to 3 months.
- Reheat from frozen. Thaw it overnight and reheat it on the stovetop or in the microwave, when you’re ready to eat.
During the winter months, we love to keep some stocked in the freezer for an easy and delicious dinner! It’s also great for meal prep! Freeze small batches for an easy lunch throughout the week. Sometimes we even make a double batch (using two large pots) then freeze a batch for dinner the next week or even month.
Helpful Tools
- Le Creuset Signature Dutch Oven – If you’re open to spending a bit of money on a piece that you’ll own forever, Le Creuset is my favorite brand for heavy pots and cookware.
- Lodge Dutch Oven – Lodge is a great brand as well. I own several of their cast iron skillets and have been very happy with them. This one is more budget-friendly, but still great quality!
- Ground Beef Chopper – This cheap ground meat chopper is life-changing! I seriously don’t know why I waited so long to order one. Makes cooking ground meat so much easier.
More Favorite Chili Recipes


If you try this chili recipe, let me know! Leave a comment and if your family loves it as much as mine does, be sure to give it a five star ⭐️ rating! Also, tag @kimscravings on Instagram with a picture of your creation. Be sure to subscribe to our mailing list to receive more healthy delicious recipes straight to your inbox.

Beef Chili Recipe
Ingredients
- 2 pounds lean ground beef*
- 2 1/2 tablespoons chili powder, divided
- 2 medium yellow onions, diced
- 2 medium green bell peppers, diced (or 1 red bell pepper and 1 green bell pepper)
- 4 cloves minced garlic , 2 teaspoons
- 1 (14.5 ounce) can crushed tomatoes, I like to use fire-roasted
- 1 (14.5 ounce) can diced tomatoes, I like to use fire-roasted
- 2 (14.5 ounce) cans beef broth
- 1 tablespoon tomato paste
- 1 tablespoon brown sugar, optional
- 1 teaspoon ground cumin
- salt & pepper to taste, I start with 1 teaspoon salt and 1/2 teaspoon ground black pepper
- Optional for serving: sour cream, grated cheddar cheese, fresh chopped cilantro, diced avocado or guacamole and sliced jalapeños
EMAIL ME THE RECIPE!
Instructions
- In a large stockpot (or dutch oven) over medium-high heat sauté 2 pounds lean ground beef* and 1 tablespoon chili powder with 2 diced yellow onions, 2 diced bell peppers and 4 cloves minced garlic until meat is just done. Don’t over-cook meat because it will continue to cook as you simmer the chili. Drain any fat.
- Add 1 (14.5 ounce) can crushed tomatoes, 1 (14.5 ounce) can diced tomatoes, 2 (14.5 ounce) cans beef broth1 tablespoon tomato paste, 1 1/2 tablespoons chili powder, 1 tablespoon brown sugarsugar (optional), 1 teaspoon ground cumin and salt & pepper to taste. Stir to combine. Bring the chili to a boil. Reduce heat and simmer uncovered 45-60 minutes or until chili has reached desired thickness.
- If you have the time, allow chili to simmer for a couple of hours, stirring occasionally. The longer you allow the chili to cook, the tastier it will become. When you're ready, ladle into bowls and top with any favorite chili toppings. We like sour cream, cheddar cheese, fresh cilantro, diced avocado and sliced jalapeños. Enjoy!
Notes
- Storing leftovers. This will stay good in your fridge for about 1 week. Once it is completely cooled, just place it in an airtight container (or multiple, if you’d like to meal prep it) without any additional toppings and store it in the refrigerator.
- Reheating. Simply pop it in the microwave using a microwave-safe bowl, or feel free to reheat it on the stovetop. Add your toppings once you’re ready to serve!
- To freeze. This freezes beautifully and reheats really well. Follow the instructions above, but instead of placing it in the refrigerator just put it in your freezer for up to 3 months.
- Reheat from frozen. Thaw it overnight and reheat it on the stovetop or in the microwave, when you’re ready to eat.
- 2 pounds lean ground beef, or any ground meat
- 2 yellow onions, diced
- 2 green bell peppers, diced (or 1 red bell pepper and 1 green bell pepper)
- 2 (14.5 ounce) cans stewed, crushed or diced tomatoes
- 2 (14.5 ounce) cans beef broth
- chili powder & ground cumin, added to your desired taste (You will most likely add a couple of tablespoons of chili powder and a teaspoon or two of cumin.)
- salt & pepper to taste
- Optional for serving: sour cream, grated cheddar cheese, fresh chopped cilantro, diced avocado or guacamole and sliced jalapeños
- In a large stockpot (or dutch oven) over med-high heat sauté ground meat with diced onion and bell pepper until meat is just done. Don’t cook meat too long because it will continue to cook within the chili.
- Add the rest of the ingredients in with the ground meat mixture, including seasonings; stir to combine. The amount of seasoning is up to you. You will most likely want to add seasoning as the chili cooks, tasting as the chili continues to cook.
- Bring the chili to a boil and then lower heat to simmer and cover.
- Chili can be enjoyed in as little as 10-20 minutes after simmering. However, if you’ve got the time, allow chili to simmer for a couple of hours, stirring occasionally. The longer you allow the chili to cook, the tastier the chili will become.
- After simmering for preferred amount of time, ladle into bowls and top with any favorite chili toppings. We like sour cream, cheddar cheese, fresh cilantro, diced avocado and sliced jalapeños.
Did you make this recipe?
Tag @kimscravings on Instagram and be sure to subscribe to our mailing list to receive more healthy and delicious recipes straight to your inbox!
So good! This was the perfect for a cozy meal. Definitely going into our regular dinner rotation!
Wow, I really love your chili recipe. Best chili recipe I’ve ever had. Thank you, it’s hard to stop eating. it. Thanks again.
This is my favorite chili recipe! I make it at least a couple times a month through the winner.
Hello, can’t wait to try this chili recipe. I would like to add a few cans of red kidney beans. Should I drain them beforehand? Thanks!
Yes, I would drain the beans. Enjoy!
I’ve made this a few times because it is our new favorite chili recipe! Made as-is is delicious. The changes I make are for personal preference, not to improve the original recipe. I use half ground beef and half stew meat, one can of fire-roasted tomatoes, and poblano pepper instead of green pepper (I don’t like green peppers). I also add the full amount suggested for the chili powder and cumin. This recipe is easy to double, which I usually do, to either share or just for the leftovers. Everyone loves this chili! Thanks for sharing!
That’s amazing to hear! Thanks so much for your comment. I’ll have to try your modifications, they sound delicious!
Going to make this chili this weekend! Does your Dad have a favorite brand of stewed tomatoes?
If you can find Cento San Marzano Peeled tomatoes, those are our favorite. Enjoy!
Oh my gosh! This chili was so good! New favorite recipe!
Simple yet Delicious!
This is one of the best if not the best chili recipe thus far! I invited some friends over and they loved it. Even my toddler enjoyed it. Thank you for this recipe.
Oh that makes me so happy! Thanks so much for taking the time to comment!
Made this last night for dinner. My family wasn’t too happy about having chili and cornbread. All I have to say is the pot was empty and no leftovers whatsoever! This was the best chili they had!
Thank you for sharing!
This is awesome! I’m so glad everyone enjoyed, and thanks so much for your comment!
Absolutely delicious! Easy to make which is a bonus! 10/10
I really liked the recipe because its not overpowered by tomatoes!The beef broth cuts the tomatoes nicely. I added 3/4 can of pinto beans. And I put it over some rice and it was great. Nice bite to it also!
So happy to hear you enjoyed! Thanks so much for your comment!
On Pinterest I looked for chili with no beans and got your recipe. I’m trying to eat a low glycemic food plan for diabetes and all the ingredients in your chili fit the bill.
I only had yellow and orange peppers so I used them and I love cinnamon so I added that as well. I also took your suggestion and let it simmer the full two hours! Delicious, absolutely delicious! We had no toppings but it didn’t need it! My husband’s taking it to work tomorrow for lunch, that’s a huge compliment, he doesn’t do that often!
This makes me so happy to hear! Thanks so much for all of your feedback!
Can you cook this in a crockpot?
Yes, I give instructions in the FAQ section of the page. Enjoy!
This looks good! How much is 1 serving size if I was to measure it out based on your macros listed above?
I’m sorry, I don’t remember. Each serving should be about 1 1/2 to 2 cups, though.
Great recipe. Making it for our Super Bowl party. Thanks
Awesome! So happy to hear!
Easy, delicious recipe! I prefer homemade, so I’m happy to now be able to make a homemade chili—no package chili seasoning packet used! I just made this chili for our dinner tonight, and it was easy to make and delicious! I added a half a red bell pepper as you gave it as an option. I’ll be making this again! Thank you!
That makes me so happy to hear! Thanks so much for your feedback!
Are you saying two 14.5 oz cans of tomatoes so 29oz total? Or two cans for 14.5oz total? Same question for beef broth.
29 ounces total for both. Enjoy!
Thank you!
Do you drain the beef mixture after it browns?
If you’re using lean ground beef, you shouldn’t have to but I would with full fat.
Had to piggy back on my last comment. I served this last night at a bonfire party and EVERYBODY loved it. Definitely a hit. My husband who is super picky about his chili loved it.
Thank you so much for sharing your dads recipe
Oh, that makes me so VERY happy!!
Omgosh, so good.
I just made this for a party I’m having tomorrow night for about 30 people.
I added 4 Jalapeños and a teaspoon of cinnamon for a little added kick and touch of sweet and it is perfect.
This makes me so happy to hear! Thanks so much for your feedback – love the addition of cinnamon!
I’m having a similar size crowd, did you double or triple the recipe?
Just made this fabulous tasting chili before I expect to lose power due to Hurricane Ian in Orlando! Grateful for delicious food to provide comfort while hunkering down during this scary storm!!
So happy to hear you’re enjoying the chili, but very sorry to hear that you’re having to deal with the hurricane. Stay safe!
Delicious and so easy!
I had to add some spices. It was a tad bland for this southern girl but all in all we enjoyed it!
This chili was easy and so flavorful! Will definitely make again!
It would be helpful for you to add measurements for the spices. When making a recipe for the FIRST time I am dependent on measurements……I adjust afterwards if I make the dish again.
Start with 1 tablespoon chili powder, 1 teaspoon cumin, 1/2 teaspoon salt, 1/4 black pepper
is the serving size one cup?
I’m pretty sure it would be at least 1 1/2 cups. I just took the recipe and divided by 8 for the nutritional info. I didn’t actually measure out the recipe in cups.
I made this chili for dinner tonight. It was a big hit with the kids since it didn’t have any beans in it. It had good flavor. My only complaint is…it was too watery. I let it simmer for an hour and a half thinking it would thicken up. Next time I will only put in 1 can of beef broth.
I have made this weekly since November. We love it that much!
I added two cans of tomato sauce as well made it fantastic chilli!
Yay! So glad you enjoyed!
LOVE this award winning chili! It turned out soooooo good! I love that it’s not too chunky, not too spicy chili so it’s perfect for me!
I did not have beef broth on hand so I substituted with chicken broth, added 4 garlic cloves and used 1/2 ground turkey 1/2 ground beef. Turned out delicious!
Sounds perfect! So glad you enjoyed!
Browned the beef then threw it all in the Instant pot for 25 minutes! Easy and delicious!
Yay! Awesome to know it worked well in the instant pot. Thanks so much for your comment!
Made this for the first time tonight. Halved the recipe and it was perfect! Will definitely be making it again and again!
Love hearing this! So glad you enjoyed!
I love a bowl of hot chili this time of year and this chili was a winning recipe. My whole family enjoyed and I will definitely make again!
We just had chilly fall weather that appeared over night and this was the perfect easy dinner! So tasty!
Made this chili last night and it was beyond delicious! Will definitely be making again and again through winter.
So much flavor in this chili, but it’s so simple too! It’s my new go-to!
Loved this recipe! I was hesitant to try because it seemed so simple, but it was absolutely delicious. I used lean ground turkey and it was fabulous!
I loved this chili so much! 🙂 Even my picky kids and hubby enjoyed!
I am such a huge fan of chili and this version was amazing! So much great flavor – can’t wait to make it again!
You are not kidding, award winning! Such a delicious chili that is also easy to make. And great game day chili – perfect for a crowd.
Great chili recipe packed with flavor. So easy too. Love the amount of detail and tips in this post.